Data visualization: global view of blog posts relationship
As stated on a post where i talked about using tf-idf to detect similarity between two blog posts, my blog is just a bunch of posts sorted by date, no category, no fancy features like user interest tracking, post ranking, etc. I usually work on many different domains (robotic, IoT, backend, frontend platform design, etc.), so my posts are mixed up between these domains. This may be difficult for readers who want to follow up their interesting topic on my blog.
So what is a good strategy for navigating between posts on a blog ?
sysmond: Simple service for (embedded) Linux system monitoring
Working on my DIY robot software (Jarvis) in headless mode, i came across a situation where i needed to monitor the system resource such as CPU, battery, memory, network and temperature to measure the "greedy" of my robotic application. Furthermore, as the robot was battery powered, battery safety was a real concern, so i needed something to monitor the battery and shutdown the system when the battery was low to protect it from falling bellow the usable voltage range.
So i've searched for an application/service that allows me to:
- Monitor system memory, CPU, storage usage and temperature
- Monitor network consumption
- Monitor the robot battery and power off the system if the battery is low
None of existing applications/services satisfy all of these requirements, especially, the battery monitoring feature. So i've decided to write a small service that i called sysmond.
sysmond is a simple service that monitors and collects system information such as battery, temperature, memory, CPU, and network usage. The service can be used as backend for applications that need to consult system status. Although it is a part of Jarvis ecosystem, sysmond is a generic service and can be easily adapted to other use cases.
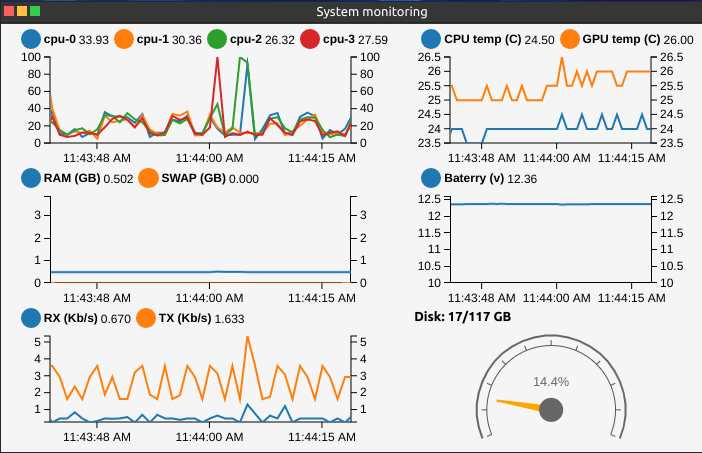
Example of AntOS web application that fetches data from sysmond and visualize it as real-time graphs on my Jarvis robot system. Detail on the use case can be found here
Sysmond monitors resource available on the system via the user space sysfs interface provided by the linux kernel.
Jarvis Arduino firmware
This post is the follow up post of the previous JETTY: Jarvis Serial to ROS-2 Transport Layer post.
The arduino firmware on the one hand implements the JETTY protocol for communicating with ROS and on the other hand takes care of all low-level hardware communication including:
- Reading of battery voltage from the ADS1115 16-Bit ADC sensor
- Reading of 9DOF IMU sensor data from MPU 9250 IMU sensor
- Reading of raw odometry data from two motor magnetic encoders
- Control two motor via Adafruit Motor Shield V2
The Jarvis booklet section Arduino Firmware presents the insight detail on the firmware implementation. It covers the following topics:
- The JETTY protocol implementation on Arduino
- Different routines implemented on the firmware
- Odometry data reading from hall effect sensor
- A strategy for battery voltage reading and monitoring
- Motors controlling
Follow up reading at: https://doc.iohub.dev/jarvis/Ym9vazovLy9jXzIvc18yL0lOVFJPLm1k/Arduino_Firmware.md
JETTY: Jarvis Serial to ROS-2 Transport Layer
My ROS based DIY robot( presented in the previous post) uses the NVIDIA Jetson Nano for high level robotic algorithms with the ROS 2 middle-ware. The Jetson is connected to an Arduino via a serial link for low-level hardware interaction and control.
As the Arduino is used for low-level communication with actuators/sensors. We need a software transport layer on top of the physical serial link (Jetson - Arduino) to stream (sensor) data/command from Arduino to ROS 2 and vice versa. On Dolly (my previous robot version), which used ROS 1, this was handled by Rosserial, a protocol for wrapping standard ROS serialized messages and multiplexing multiple topics and services over a serial link. On ROS 2, however, Rosserial is not available. Other alternative solutions exist but are not mature enough, some implementations require more computational resource which exceeds the capability of the Arduino Mega 2560.
So i decided to implement a dedicated transport layer for Jarvis called JETTY (Jarvis SErial to ROS-2 TransporT LaYer). I do not aim at a generic protocol for ROS to serial communication like ROS serial. Instead, the implementation of the transport layer should be specific only to the robot. However, the protocol must be easy to extend to adapt to any future upgrade of the robot such as adding more sensor/actuators.
Requirements on the transport layer:
- The transport layer must allow to stream data in form of frames (fixed size or not)
- Simple but reliable, unambiguous packet framing protocol, frame should be easy to identify
- Fast frame synchronization: When an endpoint (Arduino or ROS) connects to the Serial link in the middle of the data streaming, frame synchronization should be fast while minimizing the frames lost in the synchronization phase
- Frame should be verified using checksum before being consumed by an endpoint
- Packet framing overhead is allowed but need to be minimized
- The algorithms should be easy to implement and computationally inexpensive on both Jetson and Arduino
Brief, we need an efficient and reliable delimiting/synchronization scheme to detect the frame with short recovery time.
The detail on the choice of protocol and algorithm as well as insight implementation is presented on a section of my Jarvis booklet accessible via the following link:
Jarvis: The DIY robot
It has been a while since i started to build an upgraded version of Dolly, my first DIY ROS based robot. This upgraded version is named Jarvis.
Changes from the previous version:
- Hardware:
- The robot is now use tracks instead of wheels
- Jarvis footprint is bigger and has more room to mount addition components
- Jarvis uses NVIDIA Jetson Nano as high-level control board instead of Raspberry 3B (used in Dolly). The Jetson board has more GPU and processing power, and is suitable for machine learning stuffs (with the camera).
- Jarvis uses step-down voltage regulator instead of step-up regulator (Dolly), the regulator provide more juice (up to 3A for each output)
- 128 GB USB based SSD for operating system and storage instead of SD card
- Software:
- Linux Ubuntu 20.04
- ROS 2 is used instead of ROS (on Dolly)
As a work in progress, I'm now writing a booklet that detail the building process of the robot both on hardware and soft software (Arduino, ROS 2), as well as some application use cases. The initial plan is:
- Introduction
- Robot modeling and simulating with ROS 2 and Gazebo
- Building the robot hardware step by step
- Basic robot controlling software with ROS 2
- Use case projects: such as localisation and mapping, autonomous navigation, obstacle avoidance with machine learning, etc.
All further updates on the booklet can be found here: https://doc.iohub.dev/jarvis/.
Stay tunned!!!
Control GPIO using the new Linux user space GPIO API
From the version 4.8, the Linux kernel introduces a new user space API based on character devices for managing and controlling GPIOs ( General-Purpose Input/Output). This post presents the basic of the new interface as well as a simple tutorial/example to demonstrate how to use the new API to control GPIOs.
The hardware used in the tutorial is the Raspberry Pi 3B but the code is generic and can be used on any embedded hardware.
Running your own AntOS VDE system using a Docker image
Update: The image is now available on Docker Hub at: https://hub.docker.com/r/xsangle/antosaio (image:
xsangle/antosaio:latest). This post has been updated with the latest instructions on how to host a local instance of AntOS VDE using Docker.
Building and setting up AntOS from scratch can be complex, as it requires configuring and connecting many backend and front-end components. To simplify the use of AntOS as a self-hosted environment, I have created a Docker image layer for an all-in-one AntOS system that contains everything needed to host AntOS on your server. This layer allows you to build a minimal Docker image with a working AntOS system out-of-the-box:
- The web server (HTTP/HTTPS depending on the server configuration) + plugins
- AntOS server-side API
- AntOS client-side API
The Docker images are available at: https://hub.docker.com/r/xsangle/antosaio/
How does it work?
Follow the steps below to create an AntOS instance. First, create the working directory (e.g., /tmp/antos). All user data will be stored in this location. In this example, we use /tmp/antos, but in a real scenario, you should use a permanent storage location.
# modify with your own working directory
mkdir -p /tmp/antos
Run a container with docker
docker run \
    -p 8080:80 \
    --rm \
    -v /tmp/antos:/app \
    -e ANTOS_USER=demo \
    -e ANTOS_PASSWORD=demo \
    -it xsangle/antosaio:latest
Or with docker compose: docker-compose.yml
version: '3.7'
services:
  antos:
    image: xsangle/antosaio:latest
    privileged: true
    restart: always
    ports:
      - 8080:80
    container_name: antos_demo
    deploy:
      resources:
        limits:
          memory: 200m
          cpus: '0.5'
    hostname: demo
    environment:
      - ANTOS_USER=demo
      - ANTOS_PASSWORD=demo
    volumes:
      - /tmp/antos/:/app
Run:
docker compose up
AntOS is now accessible via http://localhost:8080/os/ or using IP address http://YOUR_MACHINE_IP:8080/os/
Conclusion
The docker image provides user with a ready to go (out-of-the-box) AntOS VDE system. This is useful in many user-cases:
- Quickly setup environment for AntOS applications development
- Scalable multi-user cloud-base service with AntOS and Kubenetes. Alternative to Ownclod, Google Cloud, Dropbox etc, with a more intuitive and user-friendly GUI, and more applications
How to list supported ciphers suites of a server?
I run into a problem of how to check whether my SSL ciphers suites configuration works correctly on my server.
Basically, with openssl, client can verify if the server supports a particular cipher suite using the following command:
openssl s_client -cipher "$cipher" -CAfile ca/ca.crt -connect server:port
# $cipher is the cipher suite name
So it is possible to automatically test all cipher suites supported by openssl against the server using a simple snippet of Bash, i found such script in this site https://superuser.com/questions/109213/how-do-i-list-the-ssl-tls-cipher-suites-a-particular-website-offers and modify it a little bit. Below is the script:
#!/usr/bin/env bash

# OpenSSL requires the port number.
SERVER=$1
DELAY=1
ciphers=$(openssl ciphers 'ALL:eNULL' | sed -e 's/:/ /g')

echo Obtaining cipher list from $(openssl version).

for cipher in ${ciphers[@]}
do
    echo -n Testing $cipher...
    result=$(echo -n | openssl s_client -cipher "$cipher"  -connect $SERVER 2>&1)
    if [[ "$result" =~ ":error:" ]] ; then
        error=$(echo -n $result | cut -d':' -f6)
        echo NO \($error\)
    else
        if echo $result | grep -q "Verify return code: 0 (ok)"; then
            echo YES
        else
            echo UNKNOWN RESPONSE
            echo $result
         fi
    fi
sleep $DELAY
done
AntOS 1.0.0-alpha
Github: https://github.com/lxsang/antos branch antos-1.0.0a
Demo: https://app.iohub.dev/antos/ using user name and password: demo/demo
If one wants to run AntOS VDE locally in their system, a docker image is available at:
https://github.com/lxsang/antosaio
API Documentation: https://doc.iohub.dev/antos
It has been a long time since version 0.x.x and now AntOS hits a major changes in its API. From version 1.0.0, AntOS no longer depends on Riot.js in its core UI API. This version introduces a brand new AntOS UI API called AFX API which is rewritten from bottom up. The entire AntOS core API is rewritten in Typescript (from Coffeescript) for better debugging, code maintenance and documenting.
Browser support: tested on Chrome, Firefox and partly Safari. Any browser that supports custom elements API should work. May have problem with Microsoft Edge.
Rust tip: (Unix) drop the current user privileges
Brief
Rust is a modern programing language which is claimed to be blazingly fast and memory-efficient. It syntactically similar to C++, but is designed to provide better memory safety while maintaining high performance and productivity:
- Zero cost abstraction: allow a perfect balance between performance and productivity
- Memory efficient with no runtime or garbage collector
- Memory safe: Rust does not permit null pointers, dangling pointers, or data races in safe code.
- Memory management using an ownership model guarantee memory-safety and thread-safety .
- Great documentation, easy to use compiler and integrated packages/libraries management
- Easy to interface with other language.
- A bit of learning curve for the variable ownership and variable lifetime features.